


Mirror Silver Window Film - One Way Tint
Self-adhesive. Reduces solar heat, glare and UV by over 80%.
- Excellent for heat rejection and glare reduction.
- Metalized layer in film giving a mirrored appearance.
- Professional quality - used by most professional tint shops.
- Non-Fade - Scratch Resistant.
- Prevents UV light for skin conditions and fading of fabrics etc.
- Internal Application
- Window Film Colour:- Silver Reflective
Internal Silver Reflective Mirror Privacy Window Film
This silver mirror window film can help reduce heat and glare by up to 80%. It will also give you excellent daytime privacy. This Mirrored film is suitable for all types of flat glass windows. It can be used in the home or office it is the highest quality professional window film.
Our one-way mirror film is not recommended if you are trying to achieve privacy between internal rooms, unless both rooms have a difference in light ratio, for example, one is darker than the other.
Our Mirror Silver privacy window film works by reflecting whichever side is brightest. Meaning it is fantastic for external facing glazing where the sunlight is brighter than the artificial light. Once fitted, it is entirely resistant to moisture and condensation, so a great choice for both bathrooms and kitchens. It is also very durable and easy to clean. The One Way Window Foil is easily installed by using soapy water and a few basic household tools. Easy to cut & trim to size. Reduces Solar Heat Gives excellent one-way vision during the day.
Silver Mirror Window film, is ideal for internal interior partitions ‘with different light levels’, glass staircases, offices, bathrooms, shower screens, vehicles, residential and commercial applications, infinity one-way mirrors and many other uses. The glass Foil / Film is fitted by using soapy water and a few basic household tools, these tools can also be purchased directly from us, it's easy to cut & trim to size. Reduces Solar Heat and gives excellent one-way vision during the day. Another benefit of Reflective Silver Window Film is its ability to reduce 98% of UV light (the main cause of fading).
When used as a source of Privacy, silver one-way mirror window film will work in the following method; the side with the most light will be mirrored in appearance and the side with the least light will allow a one-way viewing experience, the ability to see through the glass.
If the Reflective Silver Mirror Window film is used to reduce Glare or Excessive Solar heat, the Mirrored Silver film can reduce heat transmitted through the glass by as much as 80%, this can make an enormous difference to the usability of glass rooms and conservatories during summer, the Silver Reflective Window Film is a great way to upgrade your glazing, covering your windows with this product is a great alternative, to old-fashioned net curtains/blinds.
The Mirror Silver One Way Film, is designed to be permanent so will be very durable long term and is easy to maintain and clean, should you decide to remove the product, it can be removed, with either a steamer or scrapper.
Widths available to buy online:-
51, 76, 100, 152cm
Roll Lengths available to buy online,
1 Metre – 30 Metres
Also available in a variety of other colours and finishes:-
- Professional quality - as used by professional window film fitting companies
- Non-Fade, Easy DIY install
- Self Adhesive Film
- Easy to cut & trim to size
- Allows natural light through the film
- Mirror Silver Window Film, companies in a handy roll.
This product is also known by the following other names, Silver Privacy One Way Window Tinting Film, Silver Solar Control Window Tint, Silver Reflective Glass Film, Internal Silver Reflective Window Foil, Mirrored Silver Glass Film, Sticky Back Plastic Mirror Glass Covering Silver & Mirror Privacy Window Film.
The Mirror One Way Window Film Fitting Instructions, Technical specifications and glazing suitability chart is available to download at the bottom of the page.
The video below shows Opal White Frosted Window Film been installed. The product you are purchasing will look different but is still easily installed with the exact same method using a few basic tools, these are also available to purchase. The Window Film fitting video is only a couple of minutes long and covers all the knowledge you'll need to complete your DIY Window Film installation.
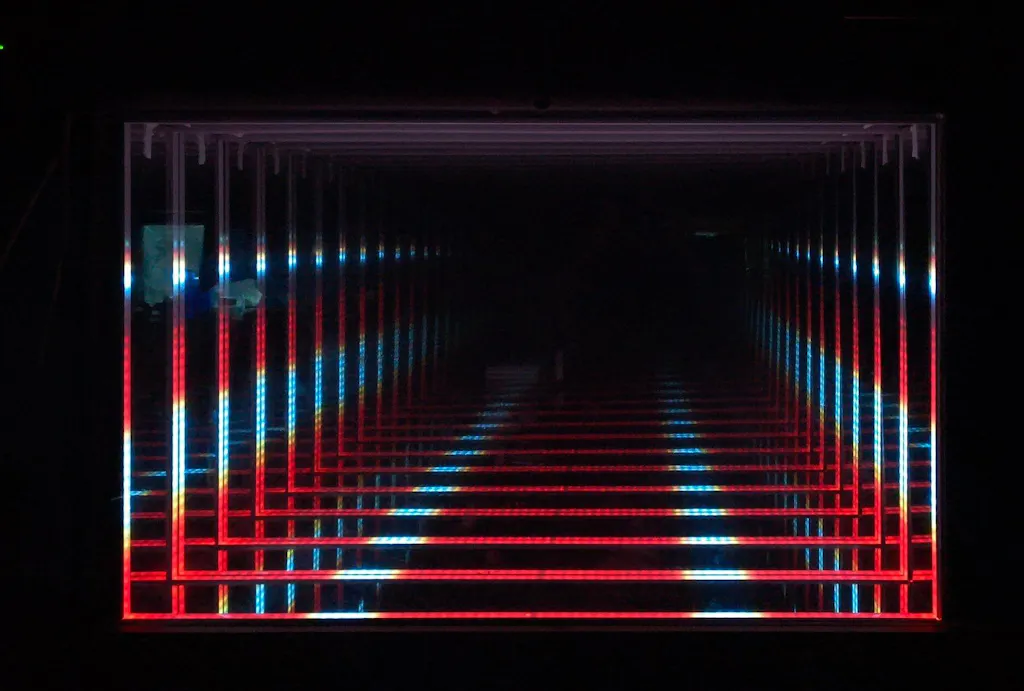
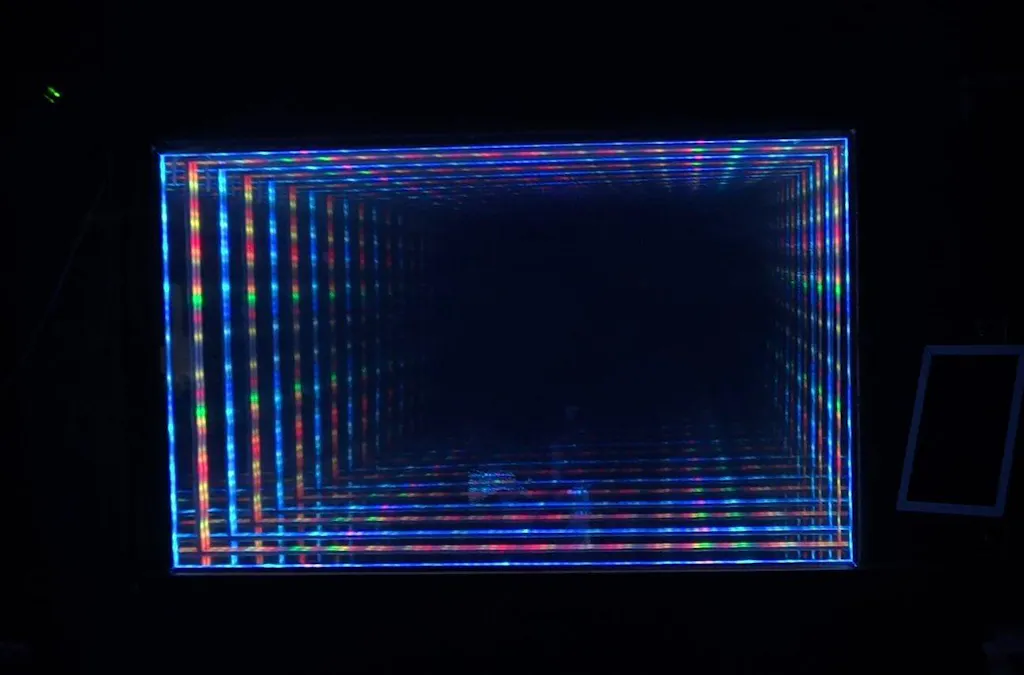
I used this mirror film for my infinity mirror project and it came out pretty well, not bad reflection and smooth surface for window film.
Excellent, solid protective packaging, easy to understandinsyructions and easy to 'install'.
Excellent product with fast delivery time
Exceeded expectations. Followed the instructions and fitted perfectly. A few bubbles or moisture at edges, but left overnight and pressed again, all good. Perfect finish, wouldn't know it was there.
The film product is excellent quality, very competitively priced and delivered in a few days. It should be noted that the film will give a very mirrored surface to the outside view of the windows that from a distance gives the appearance of the property having very clean windows. I've attached a photo for reference. On the first photo, the lower panes have the film applied, the upper panes did not.On the second photo, film has only been applied to the right hand side lower pane. From the inside, it WILL definitely darken the amount of sunlight (and heat) transmission into the room. It can be likened to having a pair of light tint sunglasses on. At night with an interior light on, it will not be possible to look out of the windows as you'll only see a reflection. At night with an interior light on, from the outside, it is possible to view into the room just as when there was no film on the window. If unsure of the tint situation, try a small area first. I had to remove one 240mmx250mm sheet due to it being slightly undersized and found that almost no amount of household cleaner, microfibre or application of hairdryer heat could eaily remove the remaining adhesive from the window. A spirit cleaner probably would have removed the adhesive much quicker. The film is delivered securely; the film is on a plastic roll with two end caps that prevent damage to the edge of the film during transit. Only instructions are provided. Tools used were: - Steel Framing Square 400 x 600mm e.g. manufactured by Draper - Sharp cutting knife e.g. manufactured by Stanley - Spray bottle (1 part washing up liquid to 4 parts water) - Rubber blade/squeegee - Thin tipped marker pen that was suitable for CDs/DVD, etc. - Microfibre cloths x 2 - Sellotape - Large cardboard sheet as a cutting board In order to make applying the film as straight forwards as possible for myself, the following was done: - The lid of the delivery cardboard box is dicarded, but the lower cardboard is kept, placed on it's side on a clean laminate floor, to hold the end caps onto the roll, whilst the film is unrolled as necessary onto the large cardboard sheet. - Measured the inside width of the glass to be covered at the top, middle and bottom, taking the smallest dimension and subtracting 5mm - Measured the inside height of the glass to be covered at the left, centre and right, taking the smallest dimension and subtracting 5mm - The inside of the film roll is the backing sheet so this is the side that has to be marked out with the aid of framing square. I did not detect any difference in the appearance of the film if the orientation was rotated, therefore film was cut to maximise usage as opposed to ensuring all window films were cut to maintain the same direction for each window. - Mark out onto the film the above dimensions. - Cut using the marking square as the cutting edge, ensuring enough pressure is applied to cut fully through the film and against the square to maintain a straight cut. If the blade is no longer really sharp, change the blade otherwise the blade will drag and locally creases the film. - Thoroughly clean the inside of the window with one of the microfibre cloths - In order to remove the backing film, apply two pieces of sellotape across one corner of the film, one on the film surface and one on the backing surface. Gently pull the two pieces of sellotape apart and the backing foil should start to come away from the film - but don't fully remove - Without creasing the film, spray copious solution onto the inside glass surface; top to bottom to enable gravity to assist - ensuring the complete glass surface has a layer of water - Remove the backing film and discard the backing film. If there are any creases in the film, it would be better to discard and re-cut a new sheet. - Offer the adhesive side of the film onto the wet glass surface. The film will 'float' on the wet surface enabling the film to be correctly positioned. If the film does not move then the glass surface was not totally wet. Gently lift the film from the area of the film that will not slide and spray the glass again - Place the other microfibre cloth or as many as necessary on the bottom of the window frame to absorb water that will be expelled. - With the film in the correct place apply some spray onto the film surface to prevent the rubber squeegee from scratching the film - using the squeegee, working from the top down and from the centre out, squeeze the water out from the between the glass and the film. On the first stroke it may be necessary to hold the film to prevent it moving. - Apply firm pressure to ensure all air pockets are removed, continually to work from the centre outwards. If necessary view the window from outside to detect any remaining air pockets. - Using the microfibres that have soaked the water to dry the frame, sill, window film - squeeze drying as necessary - I followed this process and successfully covered over 2 dozen panes.